and a video here
Saturday, May 17, 2014
Saturday, April 26, 2014
Coordinated Movement
In order to achieve smooth movement of the panels, we devised a panel pan function to step through the servo positions with a delay.
void panelPan(void const *args) {
int* argv = (int*) args;
int panel = argv[0];
int deg = argv[1];
int depth = argv[2];
int speed = argv[3];
printf("depth = %d\r\n", speed);
//speed =10 default
if(speed == NULL) speed = 10;
int i;
for(i=0;i<depth;i++) {
setPanelAngle(panel,deg,i);
wait(speed);
}
for(i=depth;i>=0;i--) {
setPanelAngle(panel,deg,i);
wait(speed);
}
}
Due to the presence of the wait function, the movement of one panel would lock up the entire mBed and only one panel would be able to move at a time. To overcome this problem we turned to the mBed RTOS library. We ran each panelPan function in a separate thread and terminated all threads at the end of a specified motion, see the left to right function below.
void leftToRight() {
int p0[] = {0,0,30,4};
int p1[] = {1,0,30,4};
int p2[] = {2,0,30,4};
int p3[] = {3,0,30,4};
int p4[] = {4,0,30,4};
int p5[] = {5,0,30,4};
int p6[] = {6,0,30,4};
Thread panel1(panelPan, (void *) &p1);
Thread panel6(panelPan, (void *) &p6);
wait(.2);
Thread panel2(panelPan, (void *) &p2);
Thread panel0(panelPan, (void *) &p0);
Thread panel5(panelPan, (void *) &p5);
wait(.2);
Thread panel3(panelPan, (void *) &p3);
Thread panel4(panelPan, (void *) &p4);
wait(1);
panel0.terminate();
panel1.terminate();
panel2.terminate();
panel3.terminate();
panel4.terminate();
panel5.terminate();
panel6.terminate();
wait(.3);
This allowed us to achieve a variety of movements as shown in the following video
One of the main challenges that we faced from a hardware perspective was current limitations. When the servo's were first powered on they draw about 1.5x their load amperage, so the power supply current limit had to be raised to provide this, in hindsight it would have been prudent to attach a large capacitor to the servo controller board to account for the spike in current draw. Additionally, in the video above, the bottom left panel never moves on the y axis. We discovered that the stabilizer axle was too tight and as a result the servo burned out and the internal gears fused preventing motion. Idle amperage draw further increased to between 1 and 2 amps due to the increased weight of the final panel design.
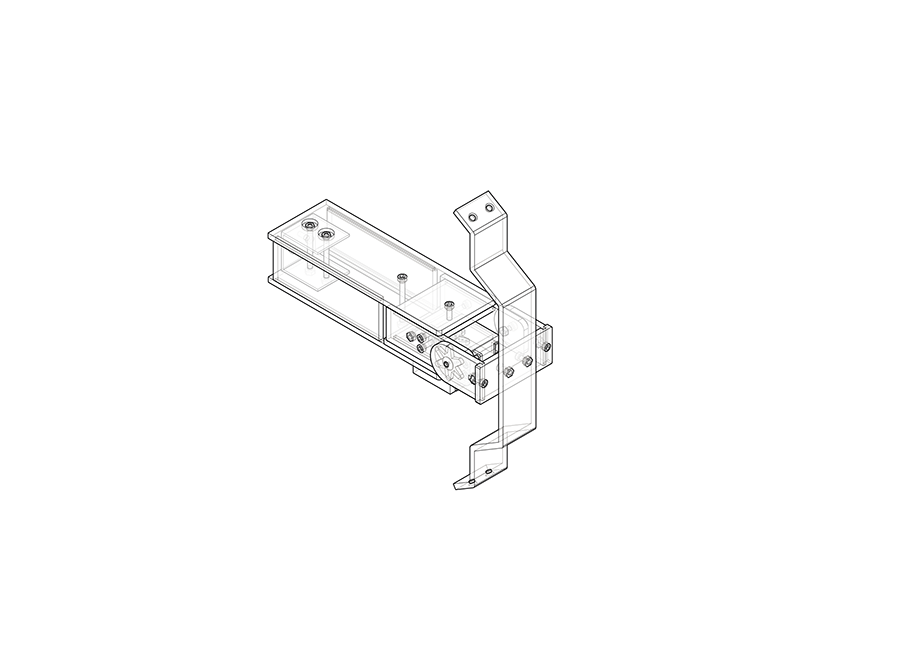
Saturday, April 19, 2014
Panel Design Revision
In order to for the panel to make more stable movements, we revised the design so that the vertical axis of the panel was stabilized on two sides, rather than just by one servo axle.

The complete CAD file for all of the core parts of the mount can be seen below

See a comparison of the movement of the first and second generation panels below.
The complete CAD file for all of the core parts of the mount can be seen below
See a comparison of the movement of the first and second generation panels below.
Saturday, April 12, 2014
Panel Movement
Using a mBed and an i2c pwm controller, we have been able to move the panel based on two parameters: the direction in degrees on the unit circle, and the depth in degrees on a perpendicular plane.
We used an LPC1768 mBed and Adafruit PWM Servo Driver board to control the two servos connected to the panel.


//input an angle between -90 and +90
//n = pwm channel to change
//angle = angle to rotate to
//pulse = # ticks/4096 * frequency -> pwm duty cycle
//pwmDutyVar = servo center calibration variable
void setServoAngle(uint8_t n, float angle) {
if(angle >= -90 && angle <=90){
float pulse = angle*2 + pwmDutyVar;
pwm.setPWM(n, 0, pulse);
}
else {
pc.printf("Angle out of range/r/n");
}
}
double degTan (double deg) {
return tan(deg *3.14/180);
}
//input an angle betweeen 0 and 359 and a depth angle
void setPanelAngle(int panel, double angle, double depth) {
int servox = 2*panel;
int servoy = servox +1;
double posx = 1/abs(degTan(angle));
double posy = abs(degTan(angle));
if((angle >45 && angle < 135)||(angle > 225 && angle < 315)) {
posx = (int) 1/abs(degTan(angle));
posy = (int) abs(degTan(angle));
}
// pc.printf("posx:%f\r\n",posx);
if(posy > 1) {
posy = depth;
}
else {
posy = posy*depth;
}
if (posx > 1) {
posx = depth;
}
else {
posx = depth*posx;
}
//pc.printf("depth: %f, angle: %f, tan: %f, abs: %f, 1/abs:%f\r\n",depth, angle, degTan(angle), abs(degTan(angle)), posx);
if(angle >=0 && angle <180) { //set y
setServoAngle(servoy,posy);
}
else {
setServoAngle(servoy,-posy);
}
if (angle <270 && angle >=90) { //setx
setServoAngle(servox,-posx);
}
else {
setServoAngle(servox,posx);
}
}
We used an LPC1768 mBed and Adafruit PWM Servo Driver board to control the two servos connected to the panel.

Code
//input an angle between -90 and +90
//n = pwm channel to change
//angle = angle to rotate to
//pulse = # ticks/4096 * frequency -> pwm duty cycle
//pwmDutyVar = servo center calibration variable
void setServoAngle(uint8_t n, float angle) {
if(angle >= -90 && angle <=90){
float pulse = angle*2 + pwmDutyVar;
pwm.setPWM(n, 0, pulse);
}
else {
pc.printf("Angle out of range/r/n");
}
}
double degTan (double deg) {
return tan(deg *3.14/180);
}
//input an angle betweeen 0 and 359 and a depth angle
void setPanelAngle(int panel, double angle, double depth) {
int servox = 2*panel;
int servoy = servox +1;
double posx = 1/abs(degTan(angle));
double posy = abs(degTan(angle));
if((angle >45 && angle < 135)||(angle > 225 && angle < 315)) {
posx = (int) 1/abs(degTan(angle));
posy = (int) abs(degTan(angle));
}
// pc.printf("posx:%f\r\n",posx);
if(posy > 1) {
posy = depth;
}
else {
posy = posy*depth;
}
if (posx > 1) {
posx = depth;
}
else {
posx = depth*posx;
}
//pc.printf("depth: %f, angle: %f, tan: %f, abs: %f, 1/abs:%f\r\n",depth, angle, degTan(angle), abs(degTan(angle)), posx);
if(angle >=0 && angle <180) { //set y
setServoAngle(servoy,posy);
}
else {
setServoAngle(servoy,-posy);
}
if (angle <270 && angle >=90) { //setx
setServoAngle(servox,-posx);
}
else {
setServoAngle(servox,posx);
}
}
Saturday, April 5, 2014
First Panel Mount
We've managed to put together a first attempt at a panel mount; it's pictured below. We were able to use an exploding gif of the hexi panel design as an example, but since both our materials and size will be different we began to CAD in SolidWorks from scratch. We were able to find a 3D scanned model of a servo horn online and integrated that into our design to ensure fit. We used laser cut acrylic to form the entirety of our mount.


Saturday, March 29, 2014
Introduction
We've decided to pursue a project inspired by the hexi responsive wall created by Thibaut Sld, pictured below. We plan to create a more modest number of panels than the 60 in the original, and give our own spin on the panel design.
 a
a
Project Timeline:
4/5 - Complete the design of one panel mount mechanism
4/12 - Finalize the mount mechanism and begin "mass production,"
4/19 - Write mBed library to control servo and panel motion in an intuitive fashion
4/26 - Integrating sensing to control panel movement
5/2 - Demo Day
Subscribe to:
Comments (Atom)